Example: PicPeak on a NAS at Home
A worked example of a real install rather than a reference page: PicPeak running on a UGREEN NAS behind a FRITZ!Box, reachable from the internet on your own domain with a Let’s Encrypt certificate. The screenshots come from an actual setup and are masked where they showed a domain, an IP or a device name.
Nothing here is UGREEN- or AVM-specific in substance. Synology, QNAP, TrueNAS and any router that can do DynDNS and port forwarding follow the same four steps — only the menus differ.
How long this takes. The setup described here took us about two hours end to end. If DynDNS, port forwarding and Docker Compose are all familiar, expect 30 to 60 minutes. If any of it is new, plan for the full two hours rather than starting half an hour before you need the gallery — it is four separate systems that each have to be right, and the errors when one is not are rarely obvious.
What you end up with
Internet
   │   gallery.example.com → home IP, kept current by DynDNS
   ▼
FRITZ!Box              80 → NAS:7080,  443 → NAS:7443
   ▼
Nginx Proxy Manager    terminates TLS, holds the certificate
   ▼   http://picpeak:3000
PicPeak (all-in-one)   one container, SQLite, one volume
Two containers, deployed together as one Docker Compose project on the NAS. Four things to set up:
- A DynDNS record, so your domain follows your changing home IP address.
- Port forwarding for 80 and 443 on the router.
- Nginx Proxy Manager, for TLS termination and the certificate.
- The Compose project itself, in the UGREEN Docker app.
This puts a service on your home connection on the public internet. Before you start, be clear that you want that: use a strong admin password, keep the image updated, and never forward the Nginx Proxy Manager admin port (81) through the router. Bots and Scanners covers what else to do once the gallery is public. If you only need access from inside your own network or over a VPN, skip all of this and use the plain Single-Container Install over HTTP.
1. DynDNS
Home connections get a new public IP address every so often, so a fixed DNS record pointing at today’s IP stops working tomorrow. DynDNS closes that gap: the router reports its current address to the DNS provider after every reconnect.
This example uses a Strato domain with Strato’s DynDNS service, driven by the FRITZ!Box. In Internet → Freigaben → DynDNS, tick DynDns aktiv and enter the update URL, domain, username and password your provider gave you.
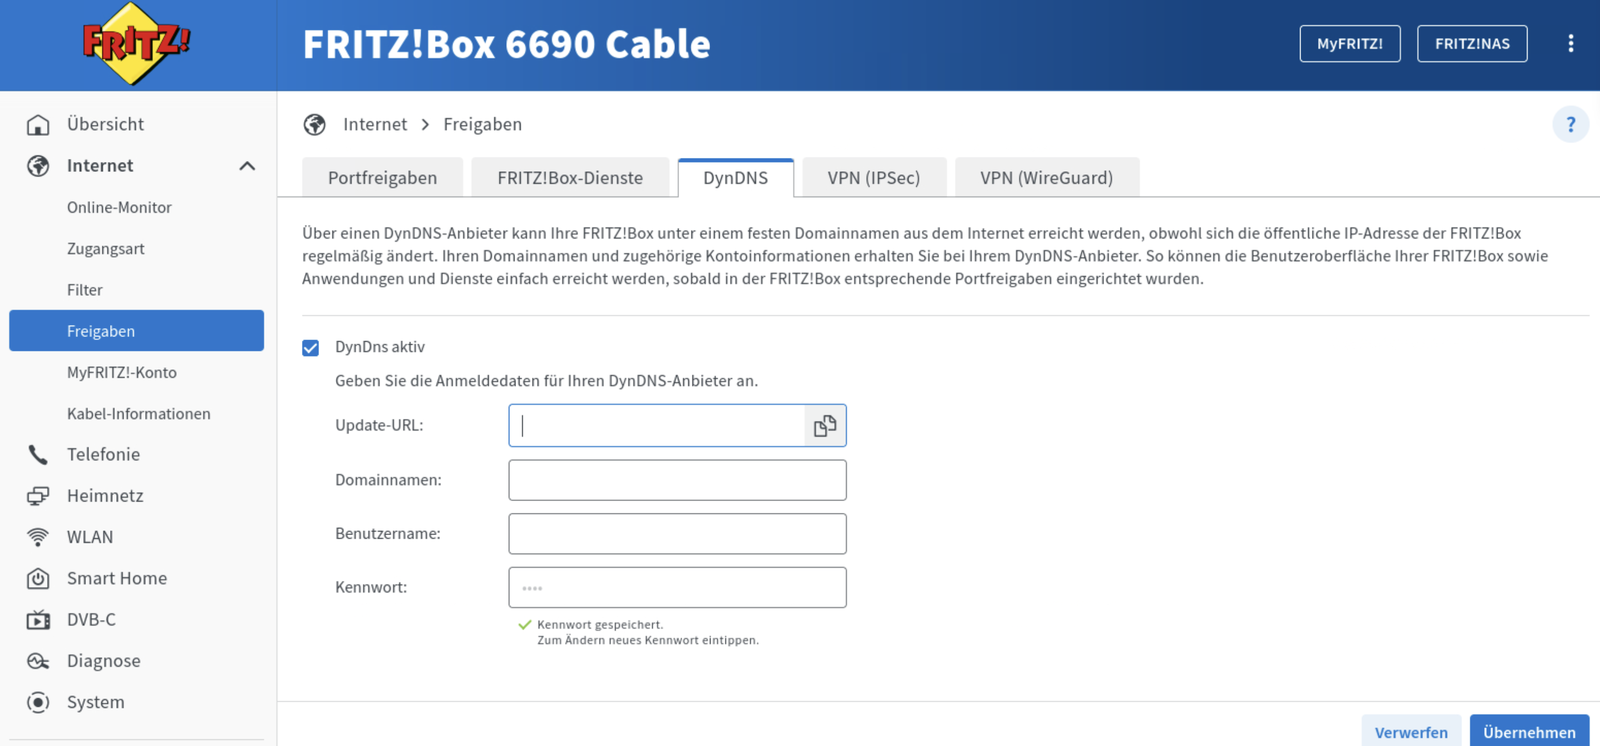
The exact update URL and credential format differ per provider and change over time, so take them from the source rather than from here:
Use a subdomain such as gallery.example.com rather than the apex domain, so the rest of your domain stays free for other things.
Check it before moving on. From outside your network (mobile data works), gallery.example.com must resolve to your current home IP. If it does not, nothing in the following steps can work, and Let’s Encrypt validation in step 3 will fail with a confusing error.
2. Port forwarding
The NAS web UI already owns 80 and 443. On UGREEN they are taken by the system interface, and a container that tries to bind them simply fails to start. This is the single most common way this setup goes wrong, and the error does not point at the cause.
The fix is to run Nginx Proxy Manager on spare ports — 7080 and 7443 — and let the router do the translation. The internet still talks to 80 and 443; only the hop from the router to the NAS uses the high ports.
Two ports need to reach the NAS from the internet. The external port is fixed by what browsers and Let’s Encrypt expect; the internal one is yours to choose:
| External | → NAS | Why |
|---|---|---|
| 80 | 7080 | Let’s Encrypt HTTP-01 validation, plus the redirect to HTTPS. Required — the certificate cannot be issued without it, and it is needed again at every renewal. |
| 443 | 7443 | The actual HTTPS traffic. |
In Internet → Freigaben → Portfreigaben, add the NAS as a device and create one sharing per port. Pick Andere Anwendung rather than the HTTP-Server / HTTPS-Server presets — the presets force the internal port to match the external one, which is exactly what you cannot use here. Set Port extern gewünscht to 80 (then 443) and Port an Gerät to 7080 (then 7443).
The overview then lists the NAS with 80 and 443 under Port extern vergeben — that column shows what the internet sees, not the internal target. The Freigaben column carries each entry’s label, so it reads HTTP-Server / HTTPS-Server for the presets and whatever name you type for an Andere Anwendung entry:
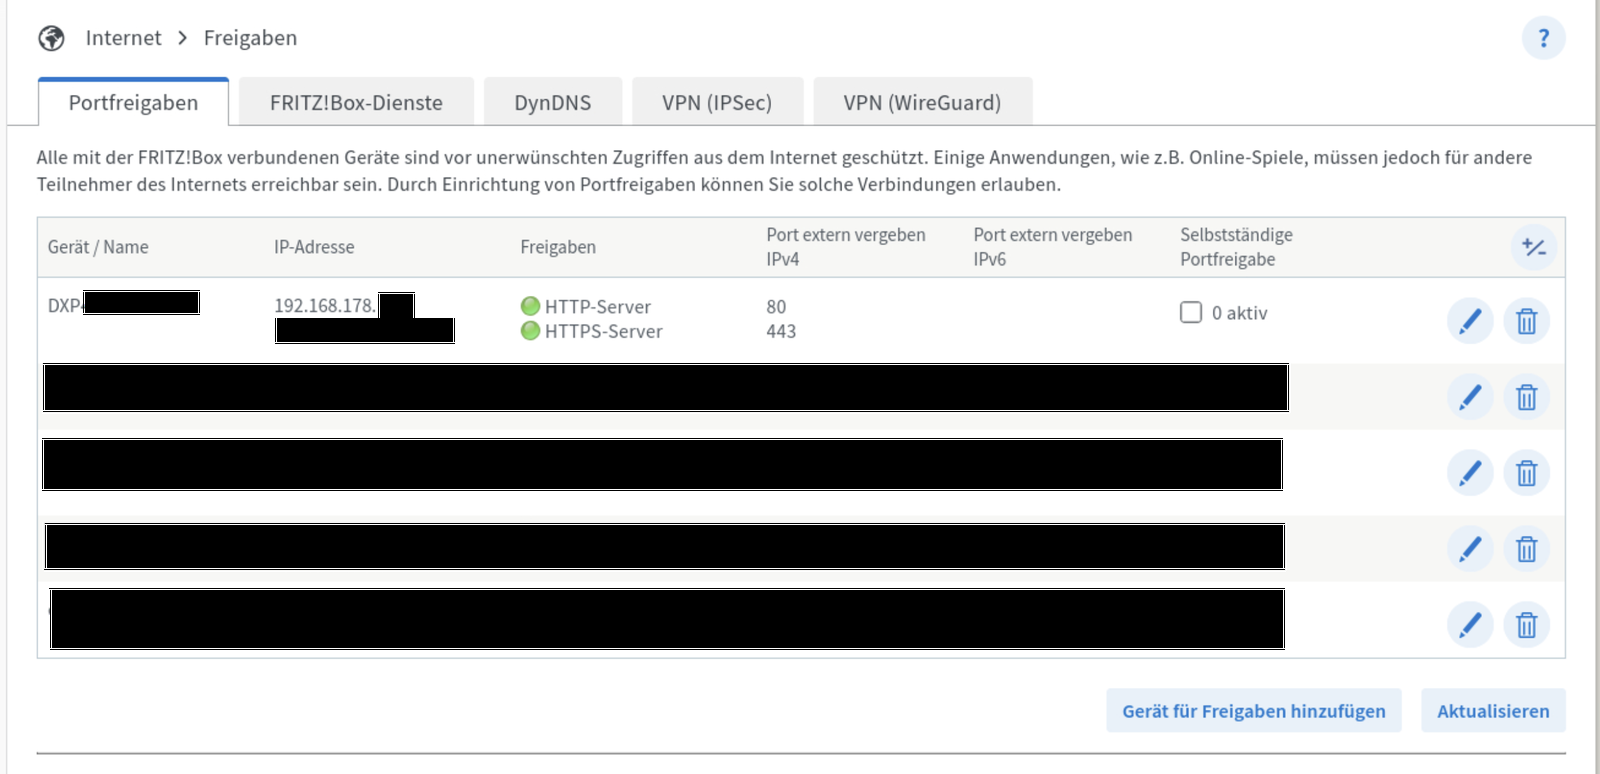
If your NAS leaves 80 and 443 free, you can skip the translation: bind Nginx Proxy Manager to 80:80 and 443:443 and use the HTTP-Server / HTTPS-Server presets. Everything else on this page is unchanged. Check first — it is quicker than debugging a container that will not start.
Give the NAS a fixed IP address in the router’s DHCP settings while you are here. A port forward points at an address, and a NAS that picks up a different one after a reboot silently takes the whole setup offline.
Port forwarding is router-specific, so follow the vendor documentation for anything that is not a FRITZ!Box:
Forward only those two entries. Do not forward the Nginx Proxy Manager admin UI (7081), the NAS web interface, SSH, or the PicPeak container port (3000). Everything the internet needs goes through the proxy on 443.
3. Deploy the Compose project
Both containers are deployed together, so this comes before configuring the proxy — Nginx Proxy Manager has to exist before you can log into it.
Create the project
In the UGREEN Docker app, go to Projekt → Erstellen. Give the project a name, pick a storage path on a native NAS volume, and paste the Compose configuration.
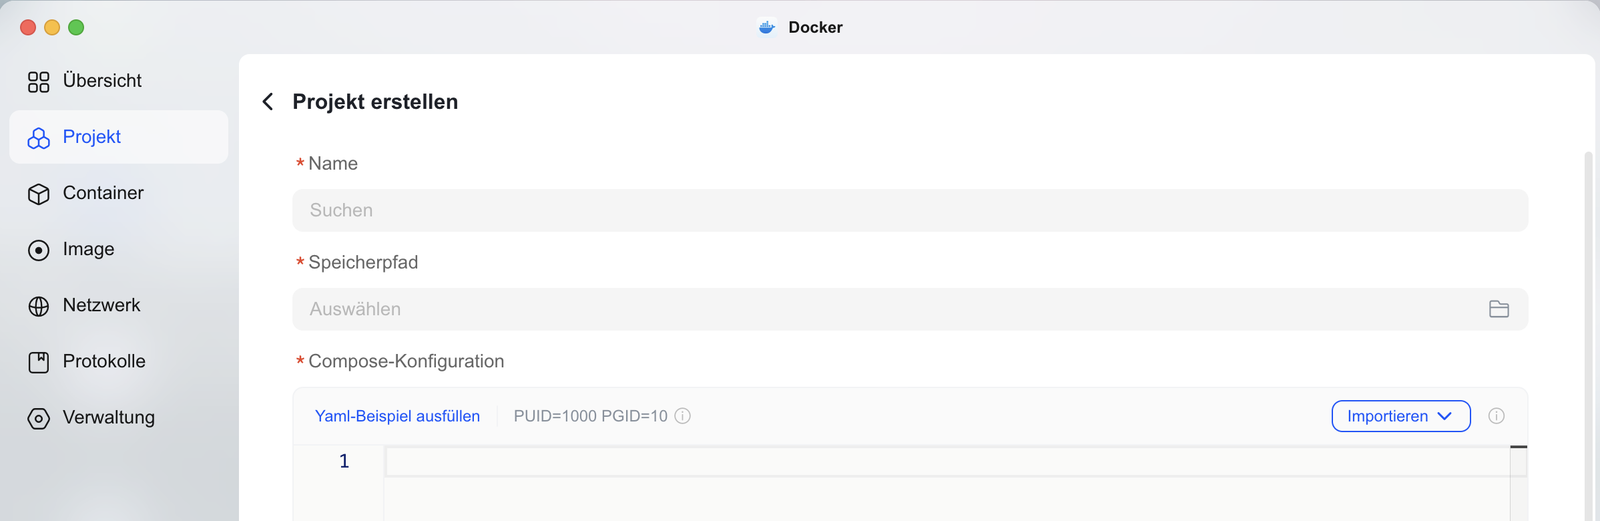
Paste the Compose file
services:
  picpeak:
    image: picpeak/aio:stable
    container_name: picpeak
    restart: unless-stopped
    volumes:
      - /volume1/docker/PicPeak/data:/data
    networks:
      - proxy
    environment:
      COOKIE_SECURE: auto
      FRONTEND_URL: "https://gallery.example.com"

  npm:
    image: jc21/nginx-proxy-manager:latest
    container_name: npm
    restart: unless-stopped
    ports:
      - "7080:80"   # ACME challenge + HTTPS redirect
      - "7443:443"  # HTTPS
      - "7081:81"   # Admin UI — LAN only, never forward
    volumes:
      - /volume1/docker/PicPeak/nginx/data:/data
      - /volume1/docker/PicPeak/nginx/le:/etc/letsencrypt
    networks:
      - proxy

networks:
  proxy:
    name: proxy
Replace gallery.example.com with your own domain and /volume1/... with the paths on your NAS.
The 7080/7443/7081 mappings on the left of each colon are the NAS-side ports the router forwards to. The 80/443/81 on the right are inside the container and never change.
Three more details worth understanding rather than copying:
picpeak/aio:stableis the all-in-one image from Docker Hub on the stable channel. The same image is on GitHub Container Registry asghcr.io/picpeak/picpeak/aio:stable— either works, Docker Hub is simply what NAS container apps search by default. Use:betato follow the beta channel. See Release Channels.COOKIE_SECURE: autolets the same instance serve public HTTPS and direct LAN HTTP with correctly-flagged session cookies. Without it you get one or the other. See Reverse Proxy → Mixed HTTPS + LAN HTTP access.FRONTEND_URLis the public address PicPeak puts into gallery links and emails. Set it to the HTTPS domain, not the LAN IP, or the links you send clients point somewhere they cannot reach.
FRONTEND_URL is optional. Leave it out and PicPeak uses the Site URL captured by the setup wizard, which records the address your browser was on when you completed setup — correct if you finish setup on https://gallery.example.com, wrong if you finish it on the LAN IP. Setting it here removes that ordering trap.
The trade-off: an explicit FRONTEND_URL pins the address. The Site URL field in Admin → Settings → General becomes read-only and says so, because an env var silently overriding a setting is worse than a locked field. To manage the address from the UI instead, drop the variable and restart.
PicPeak is deliberately not given a ports: mapping. It is reachable by Nginx Proxy Manager over the shared proxy network and by nothing else, which means the only way in from outside is through TLS on 443.
Keep the storage path on a native NAS volume (Btrfs/ext4). Do not point it at an SMB or CIFS share — the container adjusts ownership on its directories at boot, which over SMB can hang startup indefinitely.
Deploy and check
Leave Nach der Erstellung sofort ausführen ticked and deploy. The project should report both containers running.
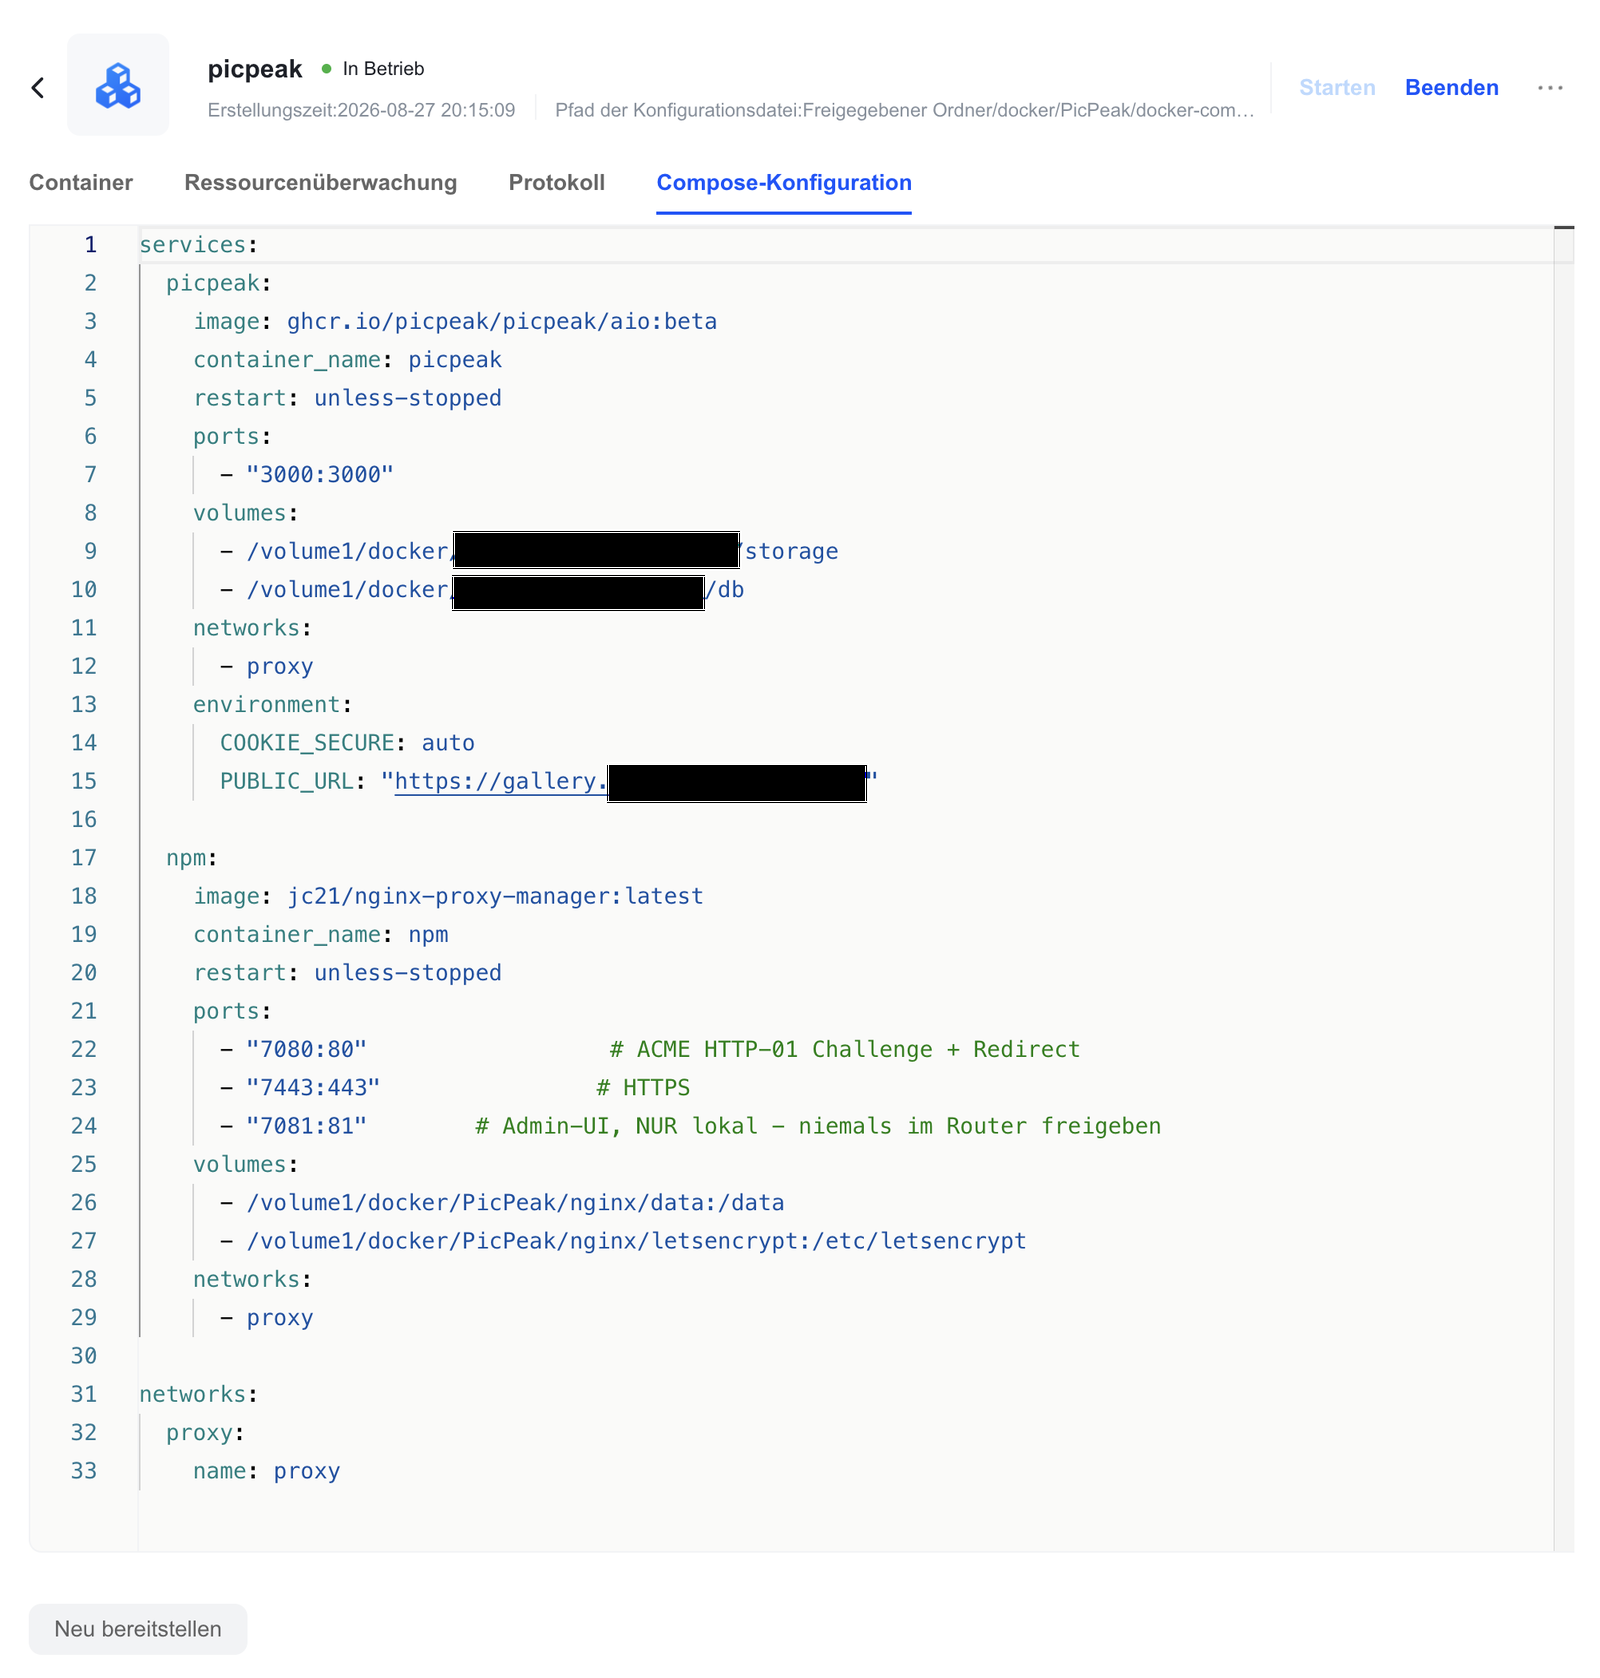
The screenshot above is the original install and differs from the Compose file printed here in three places. Use the file above.
- It sets
PUBLIC_URL, which PicPeak does not read anywhere. The correct variable isFRONTEND_URL. - It publishes
3000:3000on the PicPeak service. That exposes the app on the LAN unencrypted and is not needed — Nginx Proxy Manager reaches it over the sharedproxynetwork. - It mounts
/storageand/dbseparately. One volume at/datacovers both and is the documented layout.
4. Nginx Proxy Manager and the certificate
Open the admin UI at http://<nas-ip>:7081 from inside your network. The default login is [email protected] / changeme; it forces a password change on first use. Do this before going any further — the container is running and those credentials are public.
Add the proxy host
Under Hosts → Proxy Hosts → Add Proxy Host, point the domain at PicPeak:
| Field | Value |
|---|---|
| Domain Names | gallery.example.com |
| Scheme | http |
| Forward Hostname / IP | picpeak — the container name |
| Forward Port | 3000 |
| Access List | Publicly Accessible |
Use the container name, not the NAS LAN IP. Both containers sit on the shared proxy network, so Docker resolves picpeak for you. A LAN IP only works if PicPeak publishes port 3000 on the host — which the Compose file above deliberately does not do, and which is why the screenshot below shows an IP where you should type picpeak.
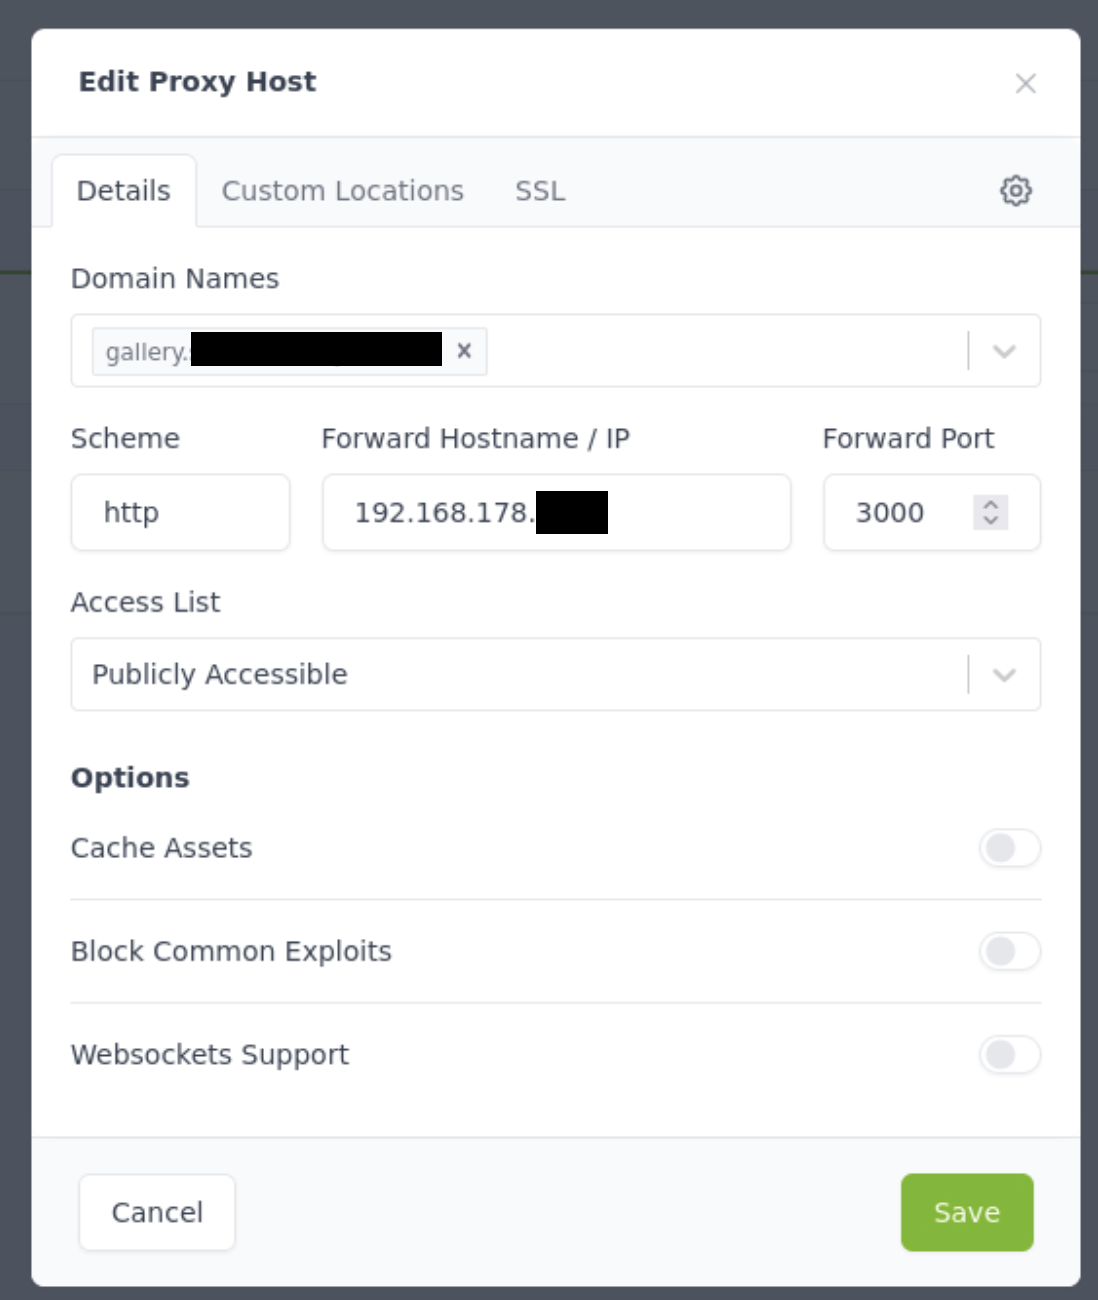
The all-in-one image serves the API, the SPA and the protected media from one port, so there is nothing to split. The per-path routing table in Reverse Proxy applies to the multi-container Compose stack, not here.
Turn Websockets Support on if you use Live Slideshow. Raise the upload limit too — Nginx Proxy Manager defaults to a small client_max_body_size, which rejects large video uploads with a 413. Add client_max_body_size 10G; under the host’s Advanced tab.
Request the certificate
On the SSL tab, choose Request a new SSL Certificate, agree to the Let’s Encrypt terms, and enable Force SSL and HSTS Enabled.
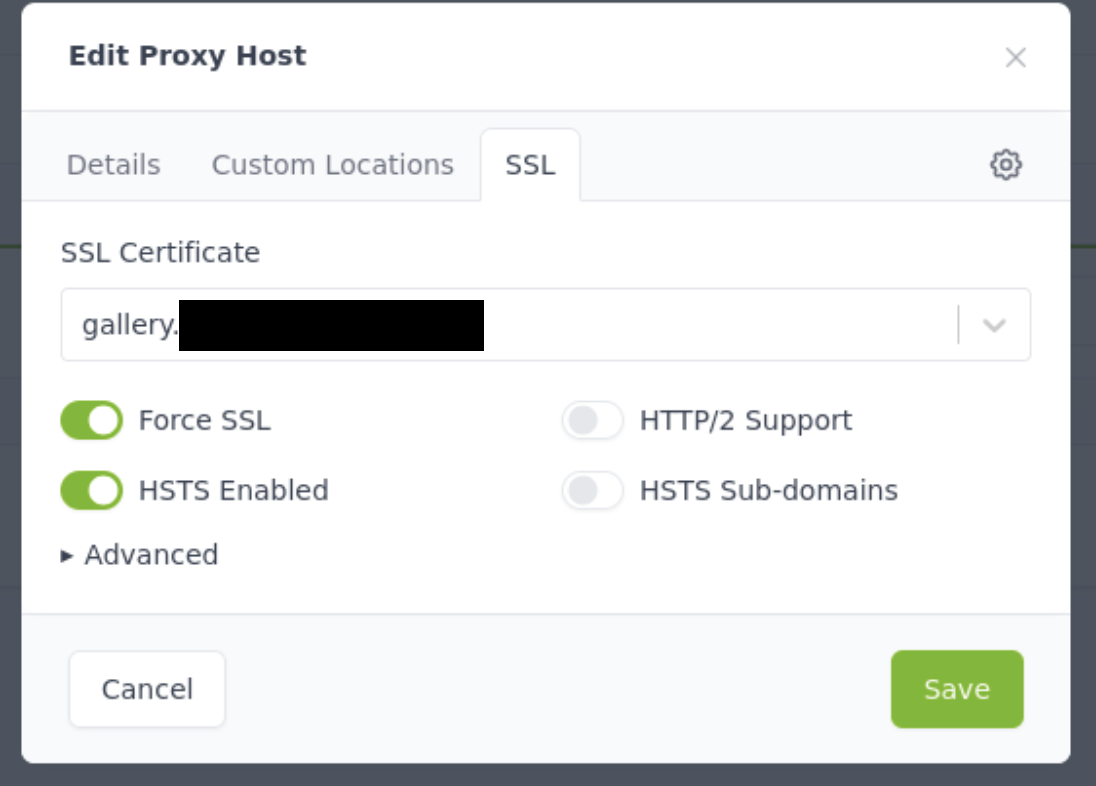
Nginx Proxy Manager runs an HTTP-01 challenge: Let’s Encrypt calls http://gallery.example.com/.well-known/acme-challenge/… on port 80 and must reach this container. This is why port 80 is forwarded, and why it must stay forwarded — renewal repeats the same challenge roughly every 60 days.
Verify
The proxy host should show Let’s Encrypt under SSL and a green Online status.
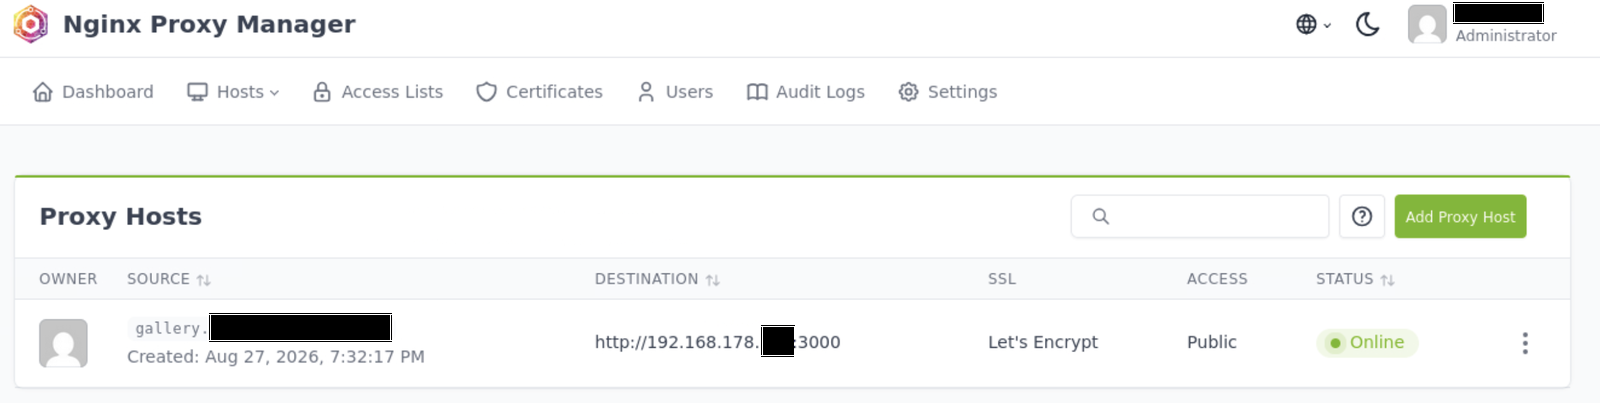
Open https://gallery.example.com/admin from outside your network — mobile data, not Wi-Fi. Many routers do not loop a public domain back to an internal host, so testing from inside can fail on a setup that is perfectly fine from the internet.
First login
PicPeak creates no admin account for you. On first start it writes a one-time setup token, and /admin will not let anyone past until that token has been used to create the first account. So the one question to answer is: how do you read a file inside a container on a NAS with no terminal?
Four ways, easiest first.
1. The mounted folder, with the NAS file manager
This is what we used, and it is the one to try first. You already mapped a folder on the NAS to /data in step 4 — so the token is sitting in that folder, reachable from the UGREEN file manager like any other file. Open:
<the folder you mapped to /data>/db/SETUP_TOKENin a text viewer. The db/ subdirectory is the part people miss — the file is not at the top of the volume.
2. The container log
In the UGREEN Docker app, open the project and look at the log of the PicPeak container. The first-run banner is printed there:
================================================================
  PicPeak first-run setup — no admin account yet.
  Open:                  https://gallery.example.com/admin
  Setup token saved to:  /data/db/SETUP_TOKEN
  (read it there — deliberately not printed)
================================================================
The log tells you where the token is, not what it is. That is on purpose: docker logs is readable by anyone who can reach the Docker UI and is not rotated away after use, so printing a live first-admin credential there would leave it lying around indefinitely. The one exception is when the token file could not be written at all — then the token itself appears in the log, because the alternative is being locked out.
Still worth opening: it confirms the exact path on your install, which settles the db/ question above without guessing.
3. SSH — only if the first two failed
Possible, but the most work, and it opens something you then have to close again:
- Enable SSH in the UGREEN system settings.
- Log in and run
docker exec <container> cat /data/db/SETUP_TOKEN, which needs you to find the container name first. - Disable SSH again afterwards.
Three steps and a loose end, for a file you can open in the file manager. Reach for it only when something is wrong with the first two.
4. Decide it up front, and skip the token
If you would rather not hunt for anything, set the admin in the Compose environment before the first start:
environment:
  ADMIN_USERNAME: admin
  ADMIN_EMAIL: [email protected]
  ADMIN_PASSWORD: a-password-you-choose
PicPeak then creates the account during first boot and never issues a token. Three caveats:
- It only applies on the very first start, while no admin exists. Setting it later does not change an existing password.
- Avoid
$in the value, or escape it as$$— Compose reads it as a variable otherwise. - Log in, change the password in the admin UI, then remove the variable, so it is not left sitting in the container configuration.
Both the token and the environment-variable route are also covered in Single-Container Install → NAS installs.
Troubleshooting
| Symptom | Likely cause |
|---|---|
| Nginx Proxy Manager will not start | It is trying to bind 80 or 443, which the NAS web UI already owns. Use 7080/7443 and forward external 80/443 to them. |
| Certificate request fails | External port 80 is not reaching the container on 7080, or DynDNS has not caught up with the current IP. Check the domain resolves correctly from outside first. |
| Works on Wi-Fi, not on mobile data | Port forwarding, DynDNS, or the NAS changed its LAN IP. Give it a static lease. |
| Works on mobile data, not on Wi-Fi | Your router does not support NAT loopback. Not a PicPeak problem — use the LAN IP from inside, or set up split DNS. |
Gallery links point at localhost or a LAN IP | FRONTEND_URL is missing or wrong. |
| Login works on HTTPS but not on the LAN IP | COOKIE_SECURE: auto is missing. |
413 on upload | Nginx Proxy Manager’s body size limit. Add client_max_body_size 10G; under the host’s Advanced tab. |
| Container unhealthy, startup hangs | The /data volume is on an SMB/CIFS share. Move it to a native volume. |
Keeping it updated
docker compose pull && docker compose up -dOr use the UGREEN Docker app’s rebuild action on the project. Migrations run automatically on start — take a backup first, and back up the whole /data volume rather than only the database, because the JWT secret at /data/db/jwt.secret is not part of the built-in backup. See Backup & Restore and Single-Container Install.